


Delimited accelerates application development by letting developers configure and embed a pre-built widget to let their users upload CSV files into the application. No more time needs to be spent writing upload, validation, mapping, UI, testing, and maintenance code.
As a developer, you just need to tell Delimited how you want your server to receive the data that your users upload. Delimited calls this configuration a schema.
Creating a Schema
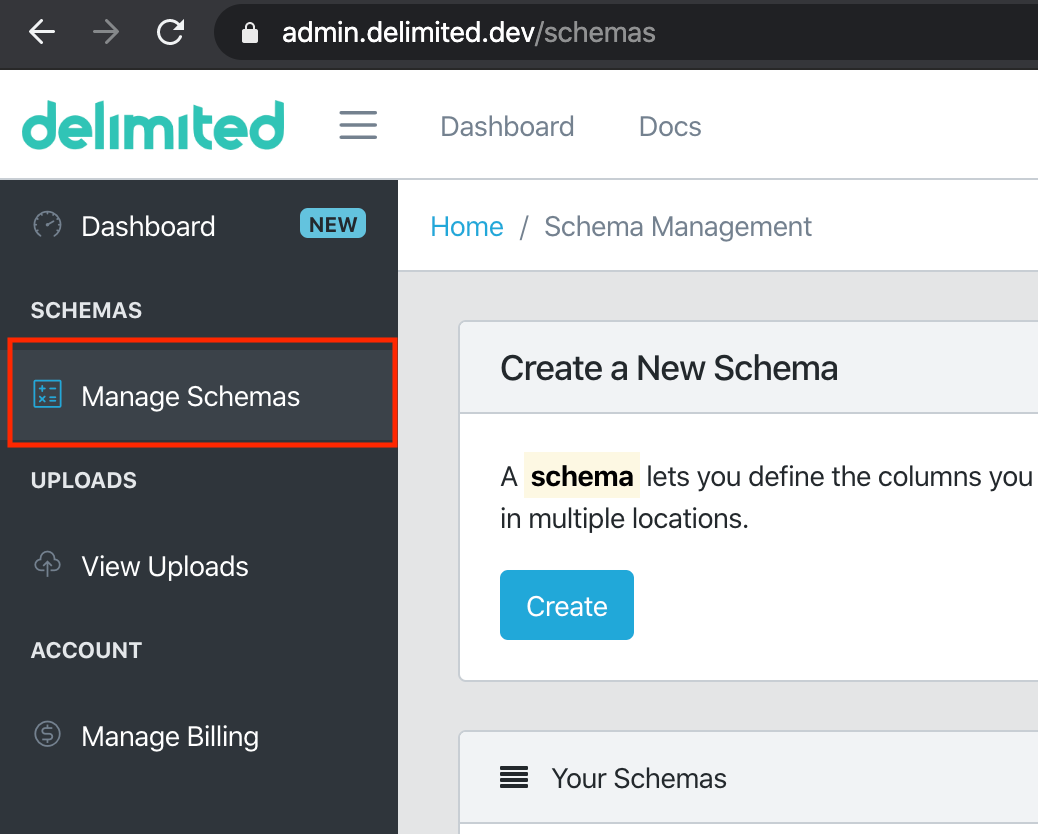
To get started, access your administrator dashboard at https://admin.delimited.dev. Click on "Manage Schemas." We will be creating a new schema.
When creating a new schema there are 4 major sections to fill in. Be sure to hit the save button at the top after making any change.
- The Basics. This includes the name of the schema and whether or not you expect the uploaded file to have a header row or not. Typically delimited files like CSVs or Excel documents will have a row indicating the names of all of the columns as the first row in the file. You tell Delimited what to expect. The options are:
- Uploader Chooses. This lets the person doing the uploading (your users) indicate whether or not the file they are uploading has a header row or not with a checkbox.
- Always. Always treat the first line of the file as a header line, using its values as titles for each column.
- Never. Never treat the first line of the file as a header line. Always treat the first line values as data and never title.s
- Advanced Options. Most delimited files will be CSVs (comma-separated value files). However, sometimes files will be delimited by different characters. This advanced options let you set the field-level and record-level delimiters in case you expect your users to be uploading different types of files.
- Destinations. This is where you would like the data sent after it has been uploaded, mapped, validated, and cleaned by Delimited.
- API URL. Currently we support HTTP POST endpoints. Paste in the URL for the server's API endpoint. Delimited will post a JSON representation of the data to that endpoint.
- Security. We recommend that you only use HTTPS endpoints and include an un-guessable token as part of your API URL. Then you can validate that the token matches on your server-side. For example, construct a URL like so:
https://api.example.com/incoming/delimited/kpqhvduguoknqxkpdwilaq...
-or-
https://api.example.com/incoming/delimited?key=kpqhvduguoknqxkpdwilaq...
- Security. We recommend that you only use HTTPS endpoints and include an un-guessable token as part of your API URL. Then you can validate that the token matches on your server-side. For example, construct a URL like so:
- Invalid Rows. While processing, Delimited could run across invalid rows: rows that fail any of the validators you can configure for each column. This option allows you to treat failures differently:
- Fail the entire upload. If an invalid value is encountered the entire upload will be marked as invalid and failed, giving the user an appropriate message and letting the user retry the upload.
- Deliver only successful rows. Only send valid rows to your endpoint. Alert the user that certain rows were marked invalid and allow the user to download only the invalid rows to try again.
- Deliver all rows, including rows with errors. This will send all parsable data to your endpoint, and mark invalid rows as such in the payload.
- API URL. Currently we support HTTP POST endpoints. Paste in the URL for the server's API endpoint. Delimited will post a JSON representation of the data to that endpoint.
- Columns. This is the meat of the schema. This is where you define which columns (i.e., fields) your endpoint requires as well as configuration for each column. Users have a chance to map the file that they provide into these column names. For each column, you can specify the following options:
- Column Name. This is the canonical name of the column that your endpoint expects. The user's data will be mapped to this column name.
- Column Description. This is a friendly description of what this column represents. It will be shown to the user on the mapping screen.
- Alternate Name. These are to help with mapping. Let's say you have a column named "Phone". You know that some of your users are likely to upload files with phone numbers in a column named "Phone Number" or "PhoneNumber" or "PhoneNum". So you can add those alternate names in here. On the mapping screen, Delimited will detect that the user is uploading a file with a column named "PhoneNum" and automatically map it to your "Phone" column. Users love this.
- Default if Blank. If the user uploads a file with a blank/empty value in this column, Delimited can automatically fill it in with a pre-configured value before sending it to your server. Enter that value here.
- Default if Invalid. If the user uploads a file with an invalid value, meaning that it failed one or more of the validations for this column, this value will be used instead if provided.
- Validations. These are rules to run in order to mark a column's value as valid. Currently the only validation supported is whether or not a value in this column is required or not.
Once done with your configuration, be sure to save your changes with the button at the top of the screen.
Testing your Schema
Once your configuration is set up, you can easily test your schema by loading the schema details page on the administrative console. Pick "Manage Schemas" on the left bar, then click on the name of your schema in the list.
Look for the "Try it out!" section.
Try uploading a file! You'll notice how fast and easy it will be for your users to upload their files into your system.
Once your schema is created, be sure to integrate the uploader into your web application.